Category: Recipe

  • Albóndigas de Pollo en Salsa Verde :: Chicken Meatballs in Green Sauce, doña Yola Style

    Doña Yola la Chef
    Several years ago, Mexico Cooks! was thrilled to meet doña Yolanda Rodríguez Orozco.  At the time, she was working at a now-defunct buffet restaurant in Morelia, Michoacán.  In Mexico, 'doña' is an honorific indicating true respect for a woman (it's don for a man).  Affectionately known to one and all as doña Yola, she cooked with tremendous love as the primary seasoning for whatever she put on the table.

    One of the most delicious items on the menu at that restaurant was Albóndigas de Pollo en Salsa Verde (chicken meatballs in green sauce).  Because I promised that I would share the recipe with all of you, doña Yola graciously shared her amazingly easy recipe with me.  Simple to prepare and marvelous to taste, these meatballs instantly made it to star status on our dining table.

    Pechuga de Pollo Molida
    A chicken vendor grinds fresh chicken breast to order at the weekly tianguis (street market) in our neighborhood.  You can ask the butcher at your supermarket to grind the breasts for you.

    Espinacas
    Gorgeous dark green vitamin-rich spinach, ready to chop for the albóndigas.

    Hierbabuena con Huevos
    Fresh hierbabuena (mint) grown in a pot on our terrace or available at any market, along with beautiful fresh local eggs.

    Albóndigas de Pollo en Salsa Verde Estilo doña Yola
    Chicken Meatballs in Green Salsa, doña Yola's Way

    Ingredients for the meatballs
    1 kilo (2.2 lbs) freshly ground chicken breast
    100 grams (more or less 1/4 lb) raw fresh spinach (stems removed), finely chopped
    1 small white onion, finely minced
    1 clove garlic, finely minced
    1 Tbsp fresh mint, finely minced
    1 chile serrano, finely minced
    1/2 cup cooked white rice
    3 eggs, lightly beaten
    1 Tbsp Worcestershire sauce
    Sea salt to taste
    Freshly ground pepper to taste
    1 tsp cornstarch or as needed

    Mezcla
    Ground chicken, spinach, onion, garlic, mint, and chile serrano, ready to mix with cooked rice.

    Procedure
    Lightly mix the first seven ingredients together.  Beat the eggs and Worcestershire sauce together and mix by hand into the mixture.  Add sea salt and ground black pepper to taste.  Add cornstarch until the mixture holds together well when you form a small amount into a ball.  Form the mixture into balls approximately 2" in diameter.  Makes 20 albóndigas.  Plate the meatballs in a single layer (Mexico Cooks! likes to re-use well-washed biodegradable meat trays from a supermarket for holding the albóndigas), then cover and refrigerate until ready to cook.

    Tomate y Chile
    Tomates verdes (you probably know them as tomatillos) and chiles serranos for preparing salsa verde.  Remove the tomatillos'  papery husks and wash the sticky tomatillos thoroughly.

    Ingredients for Salsa Verde
    10-12 tomatillos (known in Mexico as tomate verde), husks removed
    3 or 4 whole chiles serranos
    1 bunch fresh cilantro, largest stems removed
    Sea salt to taste

    Hervido

    Procedure
    In a large pot of water, bring the tomatillos and chiles to a full rolling boil.  Boil just until the tomatillos begin to crack; watch them closely or they will disintegrate in the water.

    Listo para Licuar
    Using a slotted spoon, scoop the cooked tomatillos and chiles into your blender jar.  There's no need to add liquid.  Cover, hold the blender cap on, and blend until smooth.  Be careful not to burn yourself, this is a hot mixture and tends to react like lava in the blender.  Don't ask me how I know this.

    Listo para Licuar 2
    While the blender is running, remove the center of its cap and, little by little, push the cilantro into the whizzing sauce.  Blend just until smooth; you should still see big flecks of dark green cilantro in the lighter green sauce.  Add sea salt to taste and stir.

    Ya en la Salsa
    Pour the salsa into a 2-quart pot.  Add the meatballs and bring to a simmer.  Cover and allow to simmer for about 30 minutes.  Mexico Cooks! prepared six meatballs for our comida (main meal of the day), but two meatballs apiece were plenty for the two of us.  We ate the leftovers (and another two meatballs) the following day.  We froze twelve raw meatballs without salsa for subsequent meals.

    Para dar Hambre
    Albóndigas de pollo en salsa verde, plated with white rice cooked with carrots, Mexican style.

    Mexico Cooks! is so grateful to doña Yola for sharing her recipe with us.  These albóndigas de pollo are not only easy to prepare and very healthy (with high vitamin K and beta carotene content and no added fat), but they are also absolutely delicious.

    Provecho!

    Looking for a tailored-to-your-interests specialized tour in Mexico? Click here: Tours.

  • What’s in Season in Mexico’s Markets This July?

    Mercado de Sonora Calabaza
    At the Mercado de Sonora in Mexico City, this gigantic freshly cut squash looks more like a huge flower. The squash, an extremely hard-shelled variety known as calabaza de Castilla (Castilian squash), was approximately two feet in diameter! Behind it are plátanos machos (plaintains). The squash, carefully cut in half to show its beautiful flesh and seeds, is resting on taro root rhizomes.

    Those of you who live somewhere outside Mexico and are enjoying seasonal fresh fruits and vegetables right now might be surprised to learn that even in Mexico, where the growing season can be year-round, there are times when it's the season for (insert name of item here) and we all rush to buy what's new in our markets. Whether Mexico Cooks! shops at a tianguis (street market), at an enclosed municipal market, or at a modern supermarket, seasonal fruits and vegetables are must-haves–otherwise, they won't be back in the markets till next year.

    Mercado de Jamaica Nopales
    The most recently arrived seasonal fruit for summer 2021 is the tuna (prickly pear cactus fruit).  Available by the ton from late June until sometime in September, the tuna is considered to be Mexico's national fruit.  It even appears on Mexican flag!  You can see how it grows: that's a nopal cactus paddle, with tunas growing around the outside edge. More are piled up in the boxes. The spiny, thick green peel encloses a marvelous fruit.  

    Mercado de Jamaica Tuna Pelada
    Here's a tuna that I just peeled.  Peel-and-eat, seeds and all.  Cut the ends from the tuna, make a lengthwise slit down one side of the skin, and with your fingers, simply pull the skin away from the flesh.  Chilled, the sweet, crisp tuna flesh is as refreshing as watermelon–and similarly textured. A longtime friend of mine, don Baldomero (QEPD), used to tell me, "Cristina, chickens eat little stones to help their digestion.  We Mexicans eat tunas!"

    Hongos Silvestres Morilla Mercado Jamaica
    Can you even believe it?  The cool, refreshing rainy season in central Mexico means wild mushrooms!  The season is just beginning.  I bought these glorious fresh morels at a municipal market where I often take touring foodies. Women from small towns in mountainous areas around Mexico City forage for these and other mushrooms (chanterelles and lobster mushrooms, anyone?) and sell them at local markets.  These morels were so inexpensive (80 pesos the kilo–about $4.00USD) that I bought a kilo (2.2 pounds) and gave half to my neighbor.

    Hongos Silvestres Mercado Santo Nin?o Morelia
    What you may know as lobster mushrooms (Hypomyces lactifluorum) are called trompa de puerco (pig snout) here in central Mexico. Contrary to its mushroom name, this is actually a fungus that attacks a kind of wild white mushroom, deforming it into the delicacy you see in the picture. These do sometimes appear at farmers' markets in the USA, but prepare to pay through the snout for them: upwards of $30.00USD per pound.  Here, they're a tenth that price.

    Flor de Calabaza Mercado Paracho  Michoaca?n
    These enormous just-cut flor de calabaza (squash blossoms) appear in Mexico's markets as the plants are setting their fruit.  The Purépecha indigenous woman in the photo has brought her flowers to sell on the street in Paracho, Michoacán.  Tidbit of information: only the male blossoms are cut for eating; the female flowers, notable by the spherical beginning of a squash at the base of each flower, are left on the vine to bear fruit.

    DF Mangos Parai?so Mercado Coyoaca?n
    Mangos!  It's still mango season in Mexico, and the varieties are many.  These are Paraíso (aka Hayden): about five inches long and plump as can be, the flesh is tender, sweet, and incredibly popular as a snack.  Mangos are the most-cultivated fruit in the world, with India leading the way in mango cultivation!

    Mango Flowers  Pa?tzcuaro Feb 2011
    Here's a ready-to-eat mango-on-a-stick, offered by a street vendor in Pátzcuaro, Michoacán.  Spritzed with a little jugo de limón (juice of the Key lime), sprinkled with a big pinch of salt, and dusted with crushed, dried, red chile–absolutely marvelous.  People in Mexico look forward all year long to the several months of mango season.

    Papaya
    July is also papaya season.  This variety, the usual one that we see in Mexico, is the Carica papaya–otherwise known as the Maradol.  Ranging in size from about eight inches long to a jumbo-size foot and a half, the Maradol papaya has very thin orange skin, meaty, deep orange flesh and usually a zillion firm black seeds, each about half the size of a small pea.  Eat this fruit any time: diced for breakfast, in a smoothie, or accompany your comida (main meal at midday) with a refreshing agua fresca de papaya–a papaya fruit water.

    Limo?n Criollo
    Limón criollo: Mexico's small spherical 'native' limones are known in the United States as Key limes.  These limones aren't really native to Mexico; they originated in Asia and were brought here by the Spanish nearly 500 years ago. Available all year and used ubiquitously for everything from squeezing onto fresh fruit to squeezing into your bowl of caldo de pollo (chicken soup) to spritzing onto your hands for slicking down your head of unruly hair, these green to greenish-yellow limones are available all year long.  July is their peak season, though. Their flavor is completely different from either the lime OR the lemon; oddly enough, neither Persian limes (the large oval green ones) nor Eureka lemons (the large oval yellow ones) are grown for the fresh fruit market in Mexico.  Once in a great while we see them imported.

    Sandi?a
    Last, the sandía (watermelon).  Available all over Mexico and in season right this minute, the sweetness of the fruit is as refreshing as a cool shower.  Native to somewhere in Africa–there's lots of controversy about where–and over 5000 years old, Mexico's watermelon is grown primarily in this country's western and eastern coastal states.

    Paracho Fruta con Avejas
    Fresh mango, papaya, and watermelon, ready to be seasoned just the way you like them.

    Here in Mexico, many tropical fruits are eaten sprinkled with salt, crushed, dried red chile pepper, and a squirt or two of limón.  If you've never tried it this way, you'll be surprised at how this multi-level flavor combination changes a standard sweet fruit experience to a rush of OH MY GOODNESS! in your mouth.  Many years ago, when my elderly mother visited me in Mexico, I presented her with an already-seasoned breakfast plate of fresh ripe-picked pineapple from Veracruz, ripe-picked strawberries from Michoacán, ripe-picked papaya from Chiapas, and field-ripened cantaloupe from Mexico's west coast.  Always an adventurous eater, she gobbled it right down and sighed in contentment.  She said, "Cristina, I've never really understood tropical fruit before.  It needs all those seasonings to make it just perfect."  My mother was right.

    Looking for a tailored-to-your-interests specialized tour in Mexico? Click here: Tours.

  • The Perfect Ending to Your Meal :: Gelatina, the Most-Eaten Dessert in Mexico

    3-D Flores de Gelatina
    Three-dimensional flowers made of gelatin, by my friend Irene Martínez.  Irene creates these flowers inside a square or circular shape–each petal formed by injecting a gelatin of a different color into the main shape.  Her work is almost too beautiful to eat!

    Whether you're having a midday meal at a traditional Mexican restaurant anywhere in the República or celebrating at a private party at the home of Mexican friends, you can be almost 100% sure that a prominent item on the dessert menu will be gelatins. Outside a schoolyard, students on break line up for a gelatin snack.  As you browse the produce at any town's tianguis (street market) or elbow your way through the crowds at a fiesta patronal (patron saint's celebration), you'll see vendors selling plastic cups and glasses of—you guessed it, jewel-colored gelatin desserts. Gelatina is a shimmering sweet fact of life in Mexico, popular with young and old alike.

    What is this Mexican obsession with a food that smacks of 1950s Middle America? Delight in gelatin desserts has been prevalent in Mexico for years; marketing experts here report that it's eaten daily in nearly 90% of Mexican homes. Mexicans consume more gelatin desserts than any other country in the world—three times the quantity of gelatin consumed in the United States alone. In restaurants, the dessert tray will almost always include a variety of gelatin desserts. When Señora Fulana (Mrs. So-and-So) is invited to a party at the home of her best friend, it's very traditional for her to take along a gelatin dessert, all fancied-up and ready for the admiration of the rest of the attendees. At a birthday party, the dessert of preference is rarely cake and ice cream. It's almost always a plate of cake and a jiggling serving of gelatin, which requires no refrigeration to maintain its shape.

    There are far more ways to prepare gelatin desserts in Mexico than your mother's Jell-O™ mixed with fruit cocktail or shredded celery and carrots. Some of the desserts are prepared with water, some with milk, and some are prepared as a layered combination of both.  Some are major productions involving hours of labor intensive preparation time.

    Fruit_gelatin_3
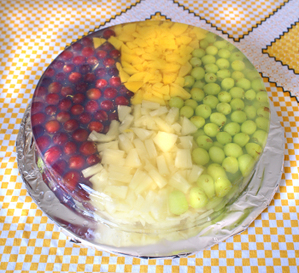
    My friend Sra. Abundis prepared this clear gelatina.  It's approximately 15" in diameter and stuffed with fresh red and green grapes, canned pineapple, and peaches.

    Tiger_gelatina 
    Sra. Abundis and Cristina prepared and painted this marvelous tiger gelatina for a child's birthday party.

    Several months ago it was my task to prepare individual serving cups of gelatin for a two-year-old neighbor's birthday party—it seemed like I made hundreds. I thought it would be a complicated and difficult project, but it turned out to be quite a lot of fun. After asking another neighbor's advice, I learned that it's possible to buy powdered gelatin at any dulcería (candy store) or grocery store. The variety of available flavors is amazing: in addition to the ordinary strawberry, lime, and orange, I also found pistachio, almond, tamarindo, peach, and, of all things, sherry.

    While I could have kept my project simple, I decided to get fancy. No single-flavor cups of gelatin for this party! I read the directions printed on each bag and learned to prepare this flavor with water, that one with milk. I combined a layer of strawberry (prepared with water) with a layer of pistachio (prepared with milk). Recklessly, I disregarded the instructions to use water to prepare the peach flavor and used milk instead, combining an opaque peach-flavored layer with a clear orange-flavored layer.

    Gelatina_pinar
    Commercially made in Guadalajara for sale in supermarkets, this three-layer single-serving gelatina includes a fruit layer (complete with a prune and its pit), a milk-based layer, and a clear layer.  The gelatina comes with its own tiny yellow plastic spoon.  These 200 gram gelatins are prepared with preservatives and artificial coloring.  Each one costs 7.1 pesos, or 65 cents US.

    Pride Gelatin  Amando Caputo 1
    Home-made layered gelatin prepared by Amanda Caputo, especially for Pride Month 2021!  

    It's so simple. Of course you can do this at home, even North of the Border. Just buy two different flavors of your favorite brand of gelatin dessert powder, some four-ounce plastic glasses, and have at it. Prepare one flavor and fill each glass to the half-way point. Refrigerate and allow that flavor to set. Prepare the second flavor, using either milk or water, pour it on top of the already jelled flavor, and refrigerate until set.

    One traditional recipe is for Mousse de Rompope (eggnog-flavored gelatin dessert). It is so delicious that it bears repeating now.

    Rompope (rohm-POH-pay) Mousse with Strawberry Sauce

    The mousse:
    2 envelopes of unflavored gelatin
    1/4 cup water
    1 cup heavy cream
    2 cups rompope (Mexican eggnog flavored liqueur)
    1/4 teaspoon vanilla extract
    4 egg whites

    In a small bowl, sprinkle the gelatin onto the water and let stand until absorbed, about five minutes. Meanwhile, heat the cream slightly in a small saucepan. (Do not boil.) Remove from heat and stir in the gelatin, mixing well to dissolve. Strain into a bowl; add the rompope and vanilla and mix well. Set aside.

    In a large bowl, beat the egg whites until they form stiff peaks. Fold in the eggnog mixture, and then pour into a lightly greased 1.5 quart ring-mold, bowl or specialty pan. Refrigerate at least four hours, preferably overnight.

    Strawberry Sauce:
    1 pound strawberries, stems removed
    2 tablespoons sugar
    1 tablespoon almond extract, anisette or Frangelica (hazelnut flavored liqueur)

    Place strawberries, sugar and flavoring in a bowl and let stand for two hours. Purée in a blender, strain and set aside.

    Just before serving, remove the mousse from its mold and drizzle with strawberry sauce. Garnish with slightly sweetened whipped cream. If desired, the mousse can be molded with a graham cracker crust.

    The preparation of gelatin desserts has been raised to a fine art in Mexico. Special classes in gelatin preparation fascinate housewives and give rise to thriving cottage industry here. Recipes metamorphose from the relatively simple preparations in the preceding recipes to the most elaborate of flavor and design combinations. Recently, the craze for making individual clear gelatin desserts which contain flowers also made of gelatin has hit Mexico like a bombshell.

    Flower_gelatina
    Flower gelatins like this one, made and copywrited by the Abundis family, are called gelatinas encapsuladas.  The flowers are made with a syringe.  Neither Sra. Abundis nor Cristina took classes in making the flowers, although many handicrafts schools and individuals offer those courses.

    This week I was fortunate to spend some time with Sra. Abundis and her daughter, mi tocaya (my namesake) Cristina, who operate a small home-based business in Guadalajara.  The Abundis family invited me to come watch and take pictures as they prepared special gelatinas for a child's birthday party.   Mother and daughter have worked together for the last two to three years, preparing made-to-order gelatins for birthdays, baptisms, girls' fifteenth birthday parties, baby showers, engagement parties, and weddings.

    The gelatina personality of the day was Spiderman.  Cristina explained that the gelatin for the Spiderman mold and many more are milk-based, while other gelatins are water-based.  Milk gives the gelatina a more nutritious aspect than does plain water and also makes Spiderman's features show up better after they're painted.

    Ingredients
    In the Abundis kitchen, Spiderman is fresh out of the mold.  A selection of milk ingredients is lined up behind him, along with a small plate full of individual-serving Spiderman heads.

    Sra. Abundis showed me the basic ingredients for the dessert; once the basics are assembled, they're flavored with vanilla.  Spiderman is prepared with powdered milk.  Other gelatinas are made with sweetened condensed milk or with evaporated milk.  The Abundis family uses pure cane sugar and unflavored gelatin for its desserts.  No preservatives are added.  These home-prepared gelatinas must be consumed within 48 hours of their preparation.

    Many fancy gelatinas are painted once they're chilled and set.  Spiderman is no exception.  The paints are special vegetable food coloring gel, manufactured here in Guadalajara. 

    Cristina_paints
    Sra. Abundis watches closely as Cristina paints Spiderman's red base coat.

    While Cristina painted, Sra. Abundis told me that when her relatives moved from Mexico City to Guadalajara in 1940, there was no gelatina in the city.  Finally the relatives found a source–one stall at the Mercado Corona in Guadalajara's Centro Histórico sold it.

    Spidermans_eyes
    Cristina starts the initial work with black gel food coloring, outlining Spiderman's eyes.  She holds a licenciatura (bachelor of arts) in graphic design from the University of Guadalajara.

    "The gelatina has to be very cold in order to paint it," Cristina commented.  "If it's not as cold and firm as possible, the paint will run."  Spiderman stayed briefly in the freezer between coats of food coloring gel.

    Spiderman_with_threads
    Spiderman's intricate thread work is complete.

    I asked Sra. Abundis and Cristina which molds are most popular for parties. "Right now, Spiderman is the one all the kids want.  Of course they also like Buzz Lightyear, Sponge Bob, all the Disney princesses, and Barbie.  The old favorites like Winnie the Pooh, Mickey Mouse, and Tweetie Bird are always popular."

    Josua_3 
    Josua Isai Abundis Linares, Cristina's nearly six year old nephew, participated eagerly in the time I spent with his family.  He and I both anticipated our dessert: one of the individual Spiderman heads.

    Cristina added, "For adult parties like weddings and baby showers, people want gelatinas encapsuladas, the ones with the flowers, to accompany their special cakes.  And it's funny, the kids gobble down their gelatinas, but the adults want to save theirs.  The flowers are so beautiful."

    Spiderman_finished
    Cristina shows off the finished product: Spiderman in person!  Sra. Abundis painted the blue base.  The cost of this fantastic super hero is 130 pesos, approximately $11.50 USD.

    "The people who ordered this Spiderman for their child's party will pick it up late this afternoon.  The party is tomorrow."  Cristina was happy that she finished the painting with no smears.  

    For dessert after your midday meal, for a snack or for a light supper, sweet wiggly gelatina satisfies every time. Cooling and slithery, a gelatina is just the ticket when you need a little something, but you don't want too much.

    They knew what they were talking about, way back then, when they said, "There's always room for…"

    Looking for a tailored-to-your-interests specialized tour in Mexico? Click here: Tours.

  • Caldo de Res, Otherwise Known As Cocido

    Cocido Cocina?ndose 1
    A big pot of cocido, simmering last week in the Mexico Cooks! kitchen.

    Nearly 40 years ago, long before the website Mexico Cooks! was a possibility–when I was just beginning to learn Spanish and some simple things about the totally-new-to-me Mexican kitchen, I would occasionally hear the word cocido from friends in Tijuana.  I looked it up in my dictionary.  I learned that cocido was the past participle for the verb cocer, to cook, or to boil.  The dictionary gave this example: "Estoy a dieta, solo puedo comer pollo cocido." (I'm on a diet, I can only eat cooked [boiled] chicken.)  OK!  That was easy.  But no, cocido isn't chicken.  Back to the drawing board.  For literally years I thought that cocido was a mystery dish that I would never see, understand, or taste.

    About 20 years ago, I was looking at a homestyle restaurant menu and the lightbulb finally went on in my brain.  I asked the waiter for a bowl of caldo de res (beef and vegetable soup), and he nodded as he wrote the order–and said, "Cocido para usted, señora."  Wait!  What?  He smiled and said, Sí, cocido.  O como dijo usted, caldo de res."  ('Yes, 'cocido', or as you said"–well, you get it.)  Like many things in Spanish, this is an example of their being more than one word for the same thing.  Part of cultural literacy is learning what is colloquially used as a name for something that also has a more formal name. 

    Now that I knew what cocido is, I found someone to teach me how to make it, and today–if you don't know how already–I'm going to teach you.  It's the simplest thing in the world, very healthy, and truly a Mexican home staple.  An all-but-boiling bowlful is just the ticket for a warming meal in the winter, or conversely, a cooling meal when the weather is hot.

    Cocido (Caldo de Res) from Michoacán

    Ingredients
    Medium white onion, coarsely chopped
    1/2 head of garlic (sliced horizontally across the head, skin and all)
    1 medium bay leaf
    2-3 Tbsp sea salt
    4-5 liters cold water
    1 kilo (2.2 pounds) meaty, bone-in chambarete (beef shank), cut across the bone
    1 kilo chuck meat, in large cubes
    .5 kilo (1 pound) bone-in costilla de res (meaty beef ribs), cut into 2" to 3" pieces

    3 or 4 medium carrots, peeled and cut into rounds
    250gr green beans, ends removed and each bean cut or broken in half
    3 or 4 large potatoes, peeled and cut into chunks or thick slices
    1 middle-size chayote, cut into eighths, seed and all
    1 small chile serrano, slit from tip almost to the stem end (optional)
    4 small calabacitas (or zucchini), cut into thick slices
    A quarter kilo (half pound) white cabbage, coarsely cut into chunks
    A good-size fistful of cilantro, stems and all
    5 or 6 sprigs of fresh hierbabuena (mint, and optional but you will love the flavor it adds)
    2 or 3 ears of fresh corn, each ear cut into thirds (optional)

    Special equipment
    A 12-to-14 liter lidded pot 
    Long wooden spoon 

    Cocido Water Boiling 1
    Bring 4 or 5 liters water, the onion, the half garlic head, the salt, and the bay leaf to a boil.  Turn the heat down to a simmer.  When the meat begins to produce foam on the surface of the water, scoop out and discard the foam.  This will clarify your beef broth.

    Cocido Chambarete 1
    A portion of the beef and its trimmings, rinsed, patted dry, and ready to go in the pot.

    Cocido Chambarete al Agua 1
    One piece at a time, quickly add the beef to the boiling water.  In just a minute or two, the beef will take on a deep brown color.  After skimming away the foam, allow the beef to simmer for about two hours.

    Ejote
    Remove the ends of the green beans and cut or break each one in half.

    Cocido Calabacita y Zanahoria 1
    Carrots and calabacita (zucchini), ready to go in the pot.

    Cocido Chayote 1
    When you're ready to chop the chayote, try to pierce the skin with your fingernail.  If it pierces easily, there's no need to peel the chayote, just chop it skin and all.  The seed is flat, round, white and soft.  The whitest part of the already cut chayote in the photograph is the seed–your knife will slide right through it, no need to remove it and cut it separately.  Now, let's chop the other half of this chayote!

    Cocido Col 1
    Coarsely chop the white cabbage, or leave it in narrow wedges, as in the photograph above.

    Cocido Papa Alfa 1
    Peel and cut up the potatoes.  These are the standard white potato in Mexico: the papa Alfa.  I started with three and added another.  You can use a different kind of potato: russet, Yukon Gold, Red Bliss, whatever potato you prefer will be delicious.

    For the tomato seasoning for the broth: put the coarsely chopped tomato, the 1/4 onion, a clove of garlic, and the chile serrano (if you're using it) into your blender.  Add the 2 cups water.  Cover and blend until smooth.   Pour this mixture into the boiling pot.

    Add all of the vegetables, including the cilantro, to the pot.  Allow the pot to return just to a boil, then lower the heat to simmer and cover, leaving the cover slightly ajar.  After 15 minutes cooking, stir the pot–the vegetables will have softened enough to be completely under water.  Simmer for approximately 45 minutes.

    Correct the salt to taste. 

    Prior to serving, remove the cilantro and the mint from the pot.

    Encuentro Tortillas Infladitas
    Freshly patted tortillas, toasting on a clay comal (griddle).  They're supposed to inflate as they toast!

    Cocido Servido 1
    An all-but-overflowing bowlful of cocido.  The house smelled delicious as it cooked, and the cocido itself was wonderful.  And there's plenty left for the next few tomorrows!

    Serve with limón (Key limes) to squeeze into the broth, hot tortillas, with corn tostadas, or with toasted bolillos (white flour, super-dense Mexican rolls).

    Serves 6 to 8 as a main dish.

    Looking for a tailored-to-your-interests specialized tour in Mexico? Click here: Tours.

  • Adobo de Cerdo Huasteco :: Pork in Huasteca Adobo Sauce), from “Verde, Blanco, y Rojo” by Ricardo Muñoz Zurita

    Adobo Asando Cebolla y Jitomate
    Roasting roma tomatoes and onion quarters on a comal (in this case, a cast iron griddle).  That little tomato on the right looks downright happy to be toasting.

    Several years ago, Mexico Cooks! was thrilled to receive a copy of Chef Ricardo Muñoz Zurita’s newest recetario (cookbook), titled Verde, Blanco, y Rojo en la Cocina Mexicana.  Due to the pressures of moving and settling into a somewhat more frenetic life in Mexico City, the very attractive book sat patiently in the kitchen bookshelf with its 150 or so brother and sister cookbooks, waiting to be chosen.  ‘Choose me, choose me!‘ it whispered each time I passed by the shelf.  And finally I listened.

    Adobo Carne de Puerco a Hervir
    Fairly large pieces of maciza de cerdo (lean, fresh pork leg) simmering with onion and garlic.

    My friends and I are very fond of traditional Mexican cuisine.  Like most people, we have our favorite dishes.  And like most people, I have a hard time breaking habits and wading into a new cookbook: it means learning a new format, a new organization of ingredients, and a new dish that I have never prepared. 

    The first task was reading the recipe all the way through to the end to make sure that I had all of the ingredients and utensils on hand prior to starting to cook and that I understood the order of cooking.  It’s really no fun at all to start the preparations and discover at the time of need that oops, there is no garlic in its basket and ouch, that one bowl I really wanted to use is full of last night’s stew.  You’ll want to organize yourself and prepare your mise en place well before you turn on the stove. 

    Adobo Chile Ancho Contraluz
    Differentiating between dried chiles ancho and chiles mulato, which look similar on the outside, can be confusing.  If you open a chile ancho and hold it up to the light, it looks from the inside like red stained glass.  The mulato, on the other hand, looks brown when held to the light.  It’s immediately apparent which this is.

    Adobo de Cerdo Huasteco
    Serves 12

    Ingredients
    2 kg (approximately 4.5 pounds) lean pork meat, cut into serving-size pieces
    1 white onion, cut into quarters
    1 head of garlic, split in half
    4 liters water
    4 tsp salt
    8 chiles guajillo
    5 large chiles ancho
    3 large tomatoes, roasted
    1/2 white onion, quartered and roasted
    5 garlic cloves
    2 tsp ground cumin
    1 tsp dry Mexican oregano, crumbled
    1/2 tsp freshly ground black pepper
    4 cloves
    3 Tbsp pork lard (you can substitute oil if you can’t get real rendered lard)
    1/2 cup white vinegar
      

    Adobo Asando Chiles Anchos
    Toasting the chiles ancho on the comal.

    Utensils 
    Comal or griddle
    Mesh strainer
    Several small or medium-size mixing bowls
    Mixing spoons
    Heavy-bottom pot with lid
    Blender

     Adobo Asando Chiles Guajillos
    Toasting the chiles guajillo on the comal.

    Procedure
    Put the pork, onion, and split-open head of garlic in a large pot.  Cover with water, add 4 tsp salt and bring to a boil.  Lower the heat until the water is simmering and cook until the pork is tender, about an hour to an hour and a half.  Remove the pork from the water, drain the liquid into a bowl, and reserve both the meat and the cooking liquid for later use.

    Remove the stems, seeds, and veins from all of the chiles and discard them.  Lightly toast the chiles on the comal, being careful not to burn them.  If they burn, they will be bitter.  Soak the toasted chiles in four cups of the reserved cooking liquid from the pork.

    Blend the soaked chiles with enough of the cooking liquid to make a smooth, somewhat liquid paste. 

    Roast the tomatoes, onions, and remaining five cloves of garlic on the comal, then blend them until they make a very smooth sauce.  If necessary for blending, add just a little of the reserved meat cooking liquid.  Using the wire mesh strainer, strain and reserve. 

    Grind the cumin, the oregano, the pepper, and the cloves together until they are powdered.  Set aside for later use.

    Over a high flame, heat the lard or oil in a heavy-bottomed pot until it smokes slightly.  Add the ground chiles (splatter alert!) and fry for about 15 minutes or until the mixture is reduced by about one-fourth.  Add the blended tomato mixture, the spices, and salt to taste.  When the mixture comes to a boil, lower the fire and allow to simmer until the sauce has reduced a little.

    Add the meat, the vinegar, and three cups of the reserved meat cooking liquid.  Correct the seasonings and cook with the lid ajar over low heat (or bake covered in a 350° oven) for about an hour.  The finished sauce should be thick enough to cover the meat without sliding off the pieces.  Correct the salt and serve.

    The finished recipe also freezes very well.  Mexico Cooks! served half the recipe as comida for six and froze the rest for a later meal. 

    Adobo Chiles Remojándose
    Both types of toasted chiles then soaked for a few minutes in some of the freshly cooked hot pork broth.

    Adobo Chiles Molidos Caldo y Especias
    The mix of various seasonings (foreground), the blended and strained chiles (left rear) and the blended tomato/onion/garlic mixture (right rear). 

    Adobo en la Olla
    The pork now needs to simmer in the adobo for an hour or more, either in the oven or over a very low fire.  The fragrance will drive you crazy, it is so tantalizing.  Mexico Cooks! prepared this recipe on top of the stove using the cast iron comal as a heat diffuser. 

    Adobo en el Plato
    Adobo de cerdo huasteco, ready to eat!  Serve the dish with steamed white rice, the green vegetable of your choice, and plenty of hot-off-the-comal corn tortillas.

    Adobo Verde Blanco Rojo Larousse
    The wonderful Spanish-language Verde, Blanco, Rojo en La Cocina Mexicana, by my friend Chef Ricardo Muñoz Zurita of the three Mexico City Restaurantes Azul.

    Looking for a tailored-to-your-interests specialized tour in Mexico? Click here: Tours. 

  • Orange-Coconut Flan a la Antigua :: It’s Time to Make This Fabulous Flan Again!

    Flan Ingredients
    The major ingredients for Mexico Cooks!' best flan ever–clockwise from the bottom: fresh oranges, cream of coconut, whole milk, real Mexican vanilla, fresh eggs, and sal del mar (sea salt, in the little red hen salt cellar).  You'll also need some sugar.

    Flanera with San Pascual Baylón
    This is a Mexican flanera (flan pan).  It's made of aluminum; the lid fastens down with a hinged clamp.  If you have one, use it.  If you don't, you can use any kind of oven-proof pan that holds about two liters.  It need not have a lid.  That's San Pascual Baylón, the patron saint of the kitchen, in the background.  He can be especially helpful at the moment you turn the chilled flan onto the serving platter.

    Flan Sugar at Beginning
    Start by caramelizing the sugar in a heavy pan.  This is an 8" enameled cast iron omelet pan; it's been in the pots and pans pantry for nearly 20 years and, for this purpose, works better than any other pan in the kitchen.  Just dump the sugar into your pan over very low heat; when you see that the sugar begins to melt a bit around the edges, move the pan a little to redistribute the sugar so that it caramelizes as evenly as possible. 

    Flan Sugar Caramelized
    When the sugar is fully caramelized, it will look like this photo.  Caveat: this process seems to take forever, but you can't hurry it.  And no matter how tempted you are, do not stir the sugar!  Just move the pan little by little, tipping the uncaramelized sugar into the melted mass.

    Flan Sugar in Flanera
    As soon as all the sugar is caramelized–while it is still boiling hot–pour it into the flanera or whatever pan you are using.  Using a potholder, tip and turn the flanera so that the sugar evenly coats the bottom and sides.  Be very careful not to burn yourself.  Set the flanera aside and complete the recipe.

    Mexico Cooks! Flan de Coco y Naranja a la Antigua (Old-Style Coconut and Orange Flan)
    8 servings

    Make the flan one day ahead of the time you want to serve it.  Once baked, it needs to chill for about 18 hours.

    Move the oven rack to its lowest position.  Pre-heat the oven to 165-170°C or 325°F. 

    Ingredients
    Caramelized Sugar
    1 cup granulated sugar
    4 Tbsp freshly squeezed orange juice

    Flan
    3 cups whole milk
    1 cup cream of coconut
    3/4 cup granulated sugar
    1 Tbsp pure vanilla extract
    1 Tbsp freshly grated orange peel
    4 eggs
    6 additional egg yolks
    pinch sea salt

    Garnish as shown in photo
    3 perfect strawberries with their leaves
    4 1/4" slices carambola (star fruit)
    2 to 4 Tbsp grated fresh coconut, toasted

    Preparation

    Caramelized Sugar
    Over a low fire, pour one cup of granulated sugar into a small, heavy skillet.  Do not stir the sugar.  When the sugar begins to melt, move the skillet a little, tipping and turning it so that all of the sugar caramelizes evenly.  Allow the sugar to boil until it is a deep caramel color.  Add the orange juice and tip gently until the juice is fully incorporated into the sugar.  Immediately pour the boiling caramelized sugar/juice mixture into the flanera or other pan, tipping the flanera until the sugar fully coats the bottom and sides.

    Flan
    In a 2-quart pot, combine the milk, 3/4 cup granulated sugar, the cream of coconut, vanilla, grated orange rind, and salt.  With a wooden spoon, stir the ingredients over a medium fire until they are well-heated.  Raise the fire to high and allow the mixture to boil, but don't let it boil over.  Continue to boil the mixture until it has reduced by nearly one cup.  Set aside and allow to cool slightly.

    Flan Leche al Cocerse
    The milk mixture needs to boil until it has reduced by about one cup.  Be sure to set it aside to cool when the reduction is finished. 

    Flan Separate Egg
    To easily separate six of the eggs so that you can use just their yolks, crack each egg into your open hand and allow the white to run through your fingers into a container.

    With an electric hand beater, beat the eggs together with the additional yolks until they are light and foamy.  Add the cooled mixture of milks.  Pour the entire mixture into the flanera or prepared pan.  If it is a flanera, cover it and fasten the latch.  If it is another type pan, do not cover.  Whichever you are using, put the recipient into a baño maría (bainmarie) and then into the pre-heated oven.

    Flan Ready to Bake
    The milk mixture in the flanera; the caramelized sugar is at the bottom.

    Flan in Baño María in Oven
    The flanera in the baño maría, just going into the oven.  The baño maría can be any kind of pan; use enough water to come about one and a half to two inches up the side of the flanera or other pan.

    Bake the flan for approximately two hours.  At the end of two hours, take the top off the flanera and test the flan by inserting a thin knife or metal skewer into the middle; if it comes out completely clean, the flan is done.  If some of the egg mixture clings to the knife or skewer, bake the flan about fifteen minutes longer, being careful not to over-cook it.

    Tip to the cook: if your cooked flan is filled with little air bubbles–you'll see them on the sides when you take it out of the flanera, and each wedge will also show air bubbles throughout–this means it's been in the oven too long.  You want a smooth, firm flan with no bubbles.  

    Once the flan is cooked, take it (still in the baño maría) out of the oven.  On a cooling rack, let the flan rest in the baño maría about fifteen minutes.  Then remove the flanera (still covered) or other pan from the baño maría and allow the flan to cool at room temperature until the pan is cool to the touch.

    Once the flan is cool, put the flanera (still covered) or other pan in the refrigerator and allow to chill until the following day.  Eighteen hours, seriously.

    To remove the flan from its mold, remove the cover and run a thin table knife around the entire edge, between the pan and the flan.  To ensure ease of release from the pan, dip just the bottom of the flanera or other pan into very hot water so that the caramelized sugar liquifies a little.  VERY CAREFULLY turn the flan out onto a platter.  Mexico Cooks! puts the platter (one with a lip) on top of the open flan mold, calls on help from San Pascual Baylón, and quickly turns the platter and the mold so that the flan slips out easily.  The caramelized sugar will run onto the top of the flan and make a pool in the bottom of the platter.

    Approximate preparation time: 30 minutes
    Approximate baking time: 2 hours
    Chilling time: 18 hours.  Truly, don't try to unmold this flan the same day you make it.

    Flan Finished Product
    The finished product, ready to be taken to the dinner table.

    Just prior to serving, decorate the flan however you like.  In the photo, you see that I put one large strawberry in the center of the flan.  I carefully made a border of toasted coconut and then cut the two remaining strawberries in half, leaving the leaves attached to each half, and placed one half at north, south, east, and west on top of the coconut.  I then placed four slices of carambola between the strawberry halves.  You could also use fresh red raspberries, thinly sliced twists of orange, and fresh mint leaves for a garnish, or any other seasonal fruit, or use no garnish at all.

    Provecho!

    Looking for a tailored-to-your-interests specialized tour in Mexico? Click here: Tours.

  • Picadillo :: Mexican Comfort Food, Just What We Need For Right Now

    This delicious recipe for picadillo (pee-kah-DEE-yoh, a kind of Mexican hash) has been a staple in my Mexican home-cooking repertoire for nearly 50 years.  A week or so ago, I was shocked to realize that I could not remember the last time I prepared it!  What in the world had I been thinking?  There is nothing that says 'comfort food' to me as loudly as this simple recipe.  You and your family or guests will love it.  

    Picadillo Cookbook
    Elisabeth Lambert Ortiz (1915-2003), a proper British woman married to Mexican diplomat César Ortiz Tinoco, learned Mexican cuisine in Mexico City, her husband's home town.  She published her wonderful The Complete Book of Mexican Cooking in 1967, which introduced the English-speaking world to some of the all but unknown regional cuisines of Mexico.  I've cooked from this ever more raggedy, taped-together, yellowing, food-stained, still-magical paperback edition since the middle 1970s, starting several years before I moved to Mexico.  The first truly Mexican recipe I ever prepared was picadillo, from Elisabeth Lambert Ortiz's book.  It's  Ortiz's version of Mexico's traditional home-style hash, and it made quite the hit with my guests, who had never heard of it prior to snarfing it down and asking for seconds at my table.  If you've never heard of it, make it as soon as you can!  

    Picadillo Ingredients 1
    When I first started making this dish in the United States, some of the ingredients were hard to source.  Today, nearly 45 years later, the ingredients for picadillo are easily available in almost any supermarket.  Starting with the bowl of ground pork at about seven o'clock in the photograph and moving clockwise, you see the raw meat, Mexican cinnamon sticks, bright orange carrots all but hidden in the dish, chiles serrano, Roma tomatoes, white potatoes, a Red Delicious apple, raisins and dried cranberries, freshly dried hoja de laurel (bay leaves), a whole white onion, and, in the little dish in the right-center foreground, home-dried Mexican oregano.  I dried the bay leaves and the oregano myself, but you can make substitutions: use ground cinnamon rather than the cinnamon sticks, store-bought bay leaves, and the oregano you normally use instead of the Mexican type; the rest of the ingredients are commonplace.

    Picadillo Onions and Chiles
    Minced chile serrano and diced white onion.

    Hash of all kinds is one of the most comfortable of comfort foods, and the hash called picadillo (the word means 'a little something chopped-up') is simply Mexico's slightly more rambunctious cousin.  This picadillo recipe is always forgiving, always flexible.  Prepare it with ground beef, ground pork, or a combination of the two meats.  Use more potatoes, fewer carrots, an extra tomato (or two, if the ones you have are quite small).  Want more picante (spiciness)?  Add more minced chile serrano.  Don't care for olives?  Leave them out.  But by all means do try picadillo: it's a far cry from your mother's canned corned beef hash.

    Picadillo Tomatoes Apple Carrots Knife
    More ready-to-cook raw ingredients, left to right: diced tomatoes; peeled, peeled, diced apple; peeled, diced carrots.  For size comparison's sake, the knife blade is 10.5" long.

    Ingredients
    1 kilo (2.2 lbs) ground pork, ground beef, or a combination of the two
    3 large, ripe Roma tomatoes, diced
    3 fresh chiles serrano, minced  (Use less chile if your tolerance for picante (spiciness) is low, more if you want more spice.)
    2 large cloves garlic, minced 
    2 medium-large white onions, peeled and diced
    4 medium carrots, peeled and diced
    1 or 2 large Red Delicious apples OR 1 or 2 large, ripe Bartlett pears OR one of each, peeled and diced
    4 medium white potatoes, peeled and diced
    1 cup large green olives, with or without pimento, sliced
    3/4 cup raisins, dried cranberries, or a combination of both
    1 tsp dried oregano, Mexican if you have it
    3 large bay leaves
    2" piece of Mexican cinnamon stick OR  big pinch of ground cinnamon
    Freshly rendered pork lard OR vegetable oil, as needed.  I'm a lard person, myself.
    Sea salt to taste
    Beef, chicken, or pork stock, tomato purée, or water, as needed

    Picadillo Olives Sliced
    Sliced large green pimento-stuffed olives.  Each of these olives measures a bit more than one inch long prior to slicing.  Slice them in thirds or quarters.

    Equipment
    A large pot with a cover.  For this quantity of picadillo, I use a shallow 4-quart enameled casserole.
    Cutting board
    Sharp knife
    Large wooden spoon

    Preparation
    Heat 3 Tbsp lard or vegetable oil in your cooking pot until it shimmers.  Add the onion and chile and sauté over medium fire until the onion is translucent.  Add the ground meat and continue to sauté over medium fire until the meat is no longer pink.  Break the meat into bite-size chunks as it sautés.  Add the rest of the ingredients.

    Picadillo All Ingredients in Pot
    After sautéeing the onion, chile, and meat, add the rest of the solid ingredients to the pot and stir to incorporate them all. T
    hen add stock, tomato purée, or water; the liquid should come to about 1/3 of the way up from the bottom of the pot.  In this instance, I used a combination of tomato purée and water.  Enlarge any photo for a bigger view; you'll be able to see that I used a combination of raisins and dried cranberries.  I had about a quarter cup of dried cranberries on hand; a neighbor loaned me the raisins to make up the difference in measurement.  The section at the bottom of the photo is blurred due to rising steam.

    Cover the pot, leaving the cover just slightly ajar.  Lower the heat to its lowest.  Set your kitchen timer for 30 minutes and go read your email, walk the dog, or look at Facebook!  When the timer rings, check the pot for liquid.  If the picadillo has absorbed most of the original liquid, add the same amount again.  With the cover ajar, continue to cook over a very low flame for another 30 minutes and correct for salt.  Voilà!  It's picadillo, ready to serve!  I made a pot of picadillo this past Sunday, and it's as good as it always has been.

    Picadillo Finished Cooking
    Picadillo, ready to serve after an hour's cooking.  This amount of picadillo will serve 6 to 8 hungry people when served over steamed white rice or Mexican red rice.  I like to prepare the picadillo recipe, serve it as a main meal, and save the rest to re-heat and serve the next day.  If anything, it is even better after a night's rest–but then, aren't we all?  After the second day, whatever picadillo is left freezes beautifully.

    Picadillo In the Plate
    Delicious, just-right spicy picadillo, served over rice.  You and your family will love this traditional Mexican meal.  By all means let me know how it goes over at your house. A huge thank you to Elisabeth Lambert Ortiz, hasta donde tú estés (wherever you might be–the hope, of course, being Heaven).

    Provecho!  (Good eating!)

    Looking for a tailored-to-your-interests specialized tour in Mexico? Click here: Tours.

  • Albóndigas de Jalisco, Estilo Diana Kennedy :: Meatballs As Made in the State of Jalisco, Diana Kennedy Style

    Albóndigas Ingredientes
    These and just a few other ingredients for albóndigas de Jalisco (Jalisco-style meatballs) combine to become a simple but delicious meal.

    The weather was cool during the day today here in Morelia, Michoacán, and it seemed an ideal day to make this truly wonderful soup for our comida (Mexico's mid-afternoon main meal of the day).  Subtly-flavored albóndigas–especially as prepared from this recipe, adapted from Diana Kennedy's book The Cuisines of Mexico–are the perfect comfort food.

    Albóndigas Ingredientes en Licuadora
    You only need to blend eggs and a few herbs and spices to give a most wonderful Mexican touch to the meat mixture for these albóndigas (meatballs).  Be sure to use mint in the meatballs–fresh if you can grow it or get it, dried if you can't.  The flavor is marvelous.

    This is a dandy recipe for cooks of any level: if you're a beginner, you'll love the simplicity of the flavors of the end product.  If you're a more advanced cook, the people at your table will believe that you worked for hours to prepare this traditional Mexican meal. 

    All the ingredients you need are undoubtedly easy for you to get even if you live outside Mexico.  Here's the list, both for the meatballs and their sauce:

    Ingredients
    Albóndigas (
    Meatballs)
    1.5 Tbsp long-grain white rice, rinsed 
    Boiling water to cover
    3/4 lb ground pork
    3/4 lb ground beef
    2 eggs
    1/4 scant teaspoon dried oregano
    4 good-sized sprigs fresh mint (preferably) OR 1 tsp dried mint
    1 chile serrano, roughly chopped
    3/4 tsp salt
    1/4 scant teaspoon cumin seeds OR ground cumin
    1/3 medium white onion, roughly chopped

    Albóndigas Carne con Líquido
    Add the liquified eggs, onions, chile serrano, herbs, and spices to the ground meats and mix well with your hands.

    Sauce
    3 medium tomatoes (about 1 lb)
    1 chile serrano, roughly chopped (optional if you do not care for a mildly spicy sauce)
    Boiling water to cover
    2 to 3 Tbsp lard, vegetable oil, peanut oil, or safflower oil (I prefer lard, for its flavor)
    1 medium white onion, quartered
    5 cups rich meat or chicken broth, homemade if possible
    About 3/4 teaspoon of the adobo (thick sauce) from a can of chiles chipotle en adobo (a smoky chile in sauce)
    Salt to taste

    For serving
    2 or 3 carrots, cut into sticks or cubes (I prefer sticks)
    2 large white potatoes, cut into sticks or cubes (I prefer sticks)

     Utensils
    A small bowl
    A large bowl
    A blender (2 uses)
    A saucepan
    A fork
    A large flameproof pot with cover

    Preparing the meatballs
    Put the rice in a small bowl and cover with boiling water.  Allow to soak for about 45 minutes.  I use the glass custard cup that you see lying on its side in the initial photo–it's just the right size.

    While the rice is soaking, put both kinds of meat into the large bowl.  

    Put the eggs, onion, and all herbs and spices–in that order–in the blender jar.  Blend until all is liquified.  Add to the meat mixture and, using your hands, mix well until the liquid is thoroughly incorporated.

    Rinse out the blender jar for its next use in this recipe.

    Drain the rice and add it to the meat mixture.  Form 16 meatballs, about 2 inches in diameter, and set aside.

    Preparing the sauce

    Albóndigas Jitomate Cocinándose
    Bring about 2 cups of water to a full rolling boil.  Cut a skin-deep cross through the stem-end of the skin of the tomato.  Add the whole tomatoes to the boiling water and allow to cook for about a minute, until the skins split.  Watch the pot, though: this procedure might take a bit less or a bit more time.  You don't want the tomatoes to cook, you just want to be able to take the skins off.

    Albóndigas Pelando Jitomate
    When the tomato skins split, take the tomatoes one by one out of the water and peel them.  If you've never tried it, believe me: this is miraculously easy–the skins are not too hot to handle and they slip off the tomatoes like little gloves.  You can see that I have stuck a fork into the stem end of the tomato for ease of handling.

    Skin the tomatoes and put them in the blender jar.  Add the roughly-chopped onion and the chile serrano.  Blend until thoroughly puréed.

    Albóndigas Manteca
    Freshly rendered manteca (lard) for frying the sauce.  If all you can get in your store is a hard brick of stark white, hydrogenated lard, don't bother.  It has no flavor and absolutely no redeeming value.  If you want to use lard, ask a butcher at a Latin market if he sells freshly rendered lard.  If none is available, use the oil of your choice.

    In the flameproof cooking pot, heat the lard or oil and add the tomato mixture you have just puréed.  Bring it to a boil and let it cook at a bubble for about three minutes.  Splatter alert here!

    Turn the flame down to a simmer and add the chicken broth to the tomato purée.  Bring it back to a simmer.  Add the meatballs, cover the pot, and let them simmer in the liquid for about an hour.

    Albóndigas Zanahoria
    After the first hour of cooking, add the carrots and the potatoes to the tomato broth and meatballs.  Cover and cook for an additional half hour.  When I made the albóndigas this time, I cubed the vegetables.  I think the finished dish is more attractive with the vegetables cut into sticks.

    Albo?ndigas 22-01-2022 1a
    The rich fragrance of the cooking albóndigas, the vegetables, and their broth penetrates every corner of our home.  By the time they're ready to eat, we are more than eager!

    Albo?ndigas Caseras Febrero 2017 1
    Albóndigas de Jalisco served with steamed white rice (you might also like to try them with Mexican red rice), sliced avocado, and fresh-from-the-comal (a Mexican griddle–mine is made of clay), hot tortillas.  This soup plate filled with albóndigas and vegetables needed more sauce; we prefer to eat them when they're very soupy.  A serving of rice topped with two meatballs plus vegetables and sauce is plenty. 

    Encuentro Tortillas al Comal
    A clay comal with fresh-made tortillas toasting over a wood fire.

    Albóndigas freeze really well, so I often double the recipe; I use a flat styrofoam meat tray from the supermarket to freeze the uncooked meatballs individually, then prepare the sauce, thaw the meatballs, and cook them as described.

    The recipe as posted above serves eight, abundantly.

    Provecho!

    Looking for a tailored-to-your-interests specialized tour in Mexico? Click here: Tours.

  • Meatless Mexican Meals for Lent :: Comida Sin Carne Durante la Cuaresma

    Atole de Grano
    Atole de grano
    , a Michoacán specialty made of tender corn and wild, licorice-scented anisillo, is a perfect cena (supper) for Lenten Fridays.

    Torta de Papa con Frijolitos Negros
    Tortitas de papa (potato croquettes, left) and frijoles negros (black beans, right) from the state of Chiapas in far-southern Mexico are ideal for a Lenten meal.

    Roman Catholic Mexicans observe la Cuaresma (Lent), the 40-day (excluding Sundays) penitential season that precedes Easter, with special prayers, vigils, and with extraordinary meatless meals cooked only on Ash Wednesday and during Lent.  Many Mexican dishes–seafood, vegetable, and egg–are normally prepared without meat, but some other meatless dishes are particular to Lent. Known as comida cuaresmeña, many of these delicious Lenten foods are little-known outside Mexico and some other parts of Latin America.

    Many observant Catholics believe that the personal reflection and meditation demanded by Lenten practices are more fruitful if the individual refrains from heavy food indulgence and makes a promise to abstain from other common habits such as eating candy, smoking cigarettes, and drinking alcohol.  

    Lent began this year on February 18, Ash Wednesday.  Shortly before, certain food specialties began to appear in local markets. Vendors are currently offering very large dried shrimp for caldos (broths) and tortitas (croquettes), perfect heads of cauliflower for tortitas de coliflor (cauliflower croquettes), seasonal romeritos, and thick, dried slices of bolillo (small loaves of white bread) for capirotada (a kind of bread pudding). 

    Romeritos en Mole
    This common Lenten preparation is romeritos en mole.  Romeritos, a slightly acidic green vegetable, is in season at this time of year.  Although it looks a little like rosemary, it has the texture of a succulent and its taste is relatively sour, more like verdolagas (purslane).

    Romeritos Mercado de Jamaica 31 de octubre 2018 1a
    Beautiful fresh romeritos at a market in Morelia, Michoacán.

    Tortas de Camarón
    You'll usually see tortitas de camarón (dried shrimp croquettes) paired for a Friday comida (midday meal) with romeritos en mole, although they are sometimes bathed in a caldillo de jitomate (tomato broth) and served with grilled and sliced nopalitos (cactus paddles).

    Huachinango Mercado del Mar
    During Lent, the price of fish and seafood in Mexico goes through the roof due to the huge seasonal demand for meatless meals.  These beautiful huachinango (red snapper) come from Mexico's Pacific coast.

    Caldo Servido 1a
    Caldo de habas secas (dry fava bean soup), delicious and thick even though meatless, warms you up from the inside as if your days are still frigid at the beginning of Lent.  Easter Sunday marks the end of Lent; this year, Easter falls on April 4.

    Trucha Zitácuaro
    Chef Martín Rafael Mendizabal of La Trucha Alegre in Zitacuaro, Michoacán, prepared trucha deshuesada con agridulce de guayaba (boned trout with guava sweet and sour sauce) for the V Encuentro de Cocina Tradicional de Michoacán held in Morelia in December 2008.  The dish would be ideal for an elegant Lenten dinner.

    Titita Capirotada
    Capirotada (kah-pee-roh-TAH-dah, Lenten bread pudding) is almost unknown outside Mexico.  Simple to prepare and absolutely delicious, it's hard to eat it sparingly if you're trying to keep a Lenten abstinence!  This photo shows capirotada as served by Carmen Titita Ramírez Degollado at the El Bajío restaurants in Mexico City.

    Every family makes a slightly different version of capirotada: a pinch more of this, leave out that, add such-and-such.  Mexico Cooks! prefers to leave out the apricots and add dried pineapple.  Make it once and then tweak the recipe to your preference–but please do stick with traditional ingredients.

    Ponche Canela y Pasitas
    At left, Mexican canela (long cinnamon sticks).  At right, dark raisins.  You'll need both of these for preparing capirotada.

    Piloncillo Cones 2 Sizes 1
    Two different sizes of cones of piloncillo (raw brown sugar).  For making capirotada, you'll want the bigger cones.

    Pan bolillo Tanganci?cuaro Michoaca?n (Silvia Sa?nchez Villegas)12
    Pan bolillo (dense white bread), Tangancícuaro, Michoacán.  Photo courtesy Silvia Sánchez Villegas.

    CAPIROTADA (Mexican Bread Pudding for Lent)
    Ingredients
    *4 fresh bollilos, in 1" thick slices–after you slice the bread, dry it in a slow oven
    5 stale tortillas
    150 grams pecans
    50 grams prunes
    100 grams raisins
    200 grams peanuts
    100 grams dried apricots
    1 large apple, peeled and sliced thin
    100 grams grated Cotija cheese
    Peel of one orange, two uses
    *3 cones of piloncillo (Mexican brown sugar)
    Four 3" pieces of Mexican stick cinnamon
    2 cloves
    Butter
    Salt

    *If you don't have bolillo, substitute slices of very dense French bread.  If you don't have piloncillo, substitute 1/2 cup tightly packed brown sugar.

    A large metal or clay baking dish.

    Preparation
    Preheat the oven to 300°F.

    Spread the dried bolillo slices with butter.  Slightly overlap the tortillas in the bottom and along the sides of the baking dish to make a base for the capirotada.  Prepare a thin syrup by boiling the piloncillo in 2 1/2 cups of water with a few shreds of cinnamon sticks, 2/3 of the orange peel, the cloves, and a pinch of salt. 

    Place the layers of bread rounds in the baking dish so as to allow for their expansion as the capirotada cooks.  Lay down a layer of bread, then a layer of nuts, prunes, raisins, peanuts and apricots.  Continue until all the bread is layered with the rest.  For the final layer, sprinkle the capirotada with the grated Cotija cheese and the remaining third of the orange peel (grated).  Add the syrup, moistening all the layers  little by little.  Reserve a portion of the syrup to add to the capirotada in case it becomes dry during baking.

    Bake uncovered until the capirotada is golden brown and the syrup is absorbed.  The bread will expand as it absorbs the syrup.  Remember to add the rest of the syrup if the top of the capirotada looks dry, and reserve plenty of syrup to pour over each serving.

    Cool the capirotada to room temperature.  Do not cover until it is cool; even after it is cooled, leave the top ajar.

    Capirotada para Cuaresma
    Try very hard not to eat the entire pan of capirotada at one sitting!  Photo courtesy Heraldo México. 

    A positive thought for this Lenten season: give up discouragement, be an optimist.

    Looking for a tailored-to-your-interests specialized tour in Mexico? Click here: Tours. 

  • Warm Your Body, Warm Your Soul: Mexico’s Wintertime Hot Punch

    Ponche Naviden?o Mexico Desconocido
    Mexico's fragrant, delicious ponche navideño–Christmas punch, served piping hot throughout the winter.  What many people don't know is that large parts of Mexico are extremely chilly–to downright cold, with snowfall!–during the mid-winter.  This hot punch, loaded with seasonal fruits and sweet spices, is a do-not-miss at our winter festivities.  The recipe is simple and the rewards are many; you, your family, and your cold-weather guests will love it as much as I do.  I wish the computer had a scratch-and-sniff capacity–the fragrance of the ponche would make your mouth water.  Photo courtesy México Desconocido.

    At nearly every mid-winter party in Mexico, you'll find a big vat of steaming hot, homemade ponche navideño.  Served with or without a piquete (a shot of rum, tequila, or other alcohol), this marvelous drink will warm you from the inside out.  Really, it wouldn't be Christmas (or a posada, or New Year's Eve, or February 2) without it.  Here's the recipe I've used for years.  

    Ponche Navideño Mexicano**
    **You should be able to buy everything on this list at your local Latin market

    2 pounds sugar cane, peeled and cut into 3” sticks
    1 pound apples, cored and cut into thin slices or chunks
    1 pound pears, cored and cut into thin slices or chunks–Bosc are excellent for this
    10 ripe guavas, cut in quarters and seeded
    Peel of one orange 
    1 pound tejocotes, cut in quarters and seeded
    1/2 pound tamarind fruit removed from the pods and deveined
    1/2 pound prunes with or without seeds
    2 ounces dried jamaica flowers
    2 whole cloves
    1 star anise pod (optional)
    1 kilo piloncillo (Mexican brown sugar)
    1/2 cup white sugar (optional)
    A pinch of salt.  Just a pinch!
    2 long sticks Mexican cinnamon, broken in thirds or quarters

    6-8 quarts of water or more

    Special Equipment
    A 12-to-14 quart lidded pot
    __________________________________________________________________

    Just before you start cutting up fruit, put 6 quarts of water in a pot, cover it, and over high heat, bring the water to a boil.  

    Add all the cut fruit to the pot and bring the pot back to a boil.  Then lower to simmer and simmer for 20 minutes.  If you think the pot needs more water, bring it to a boil separately and add it little by little.

    Add the tamarind, the prunes, the jamaica, the cloves, the piloncillo, the white sugar, the cinnamon, and continue to simmer until all of the fruit is soft and very tender. 

    We usually ask our adult guests if they'd like their cups of ponche "con piquete".  Add a shot to each cup as requested, prior to adding the hot ponche.

    Serves 12 to 15.  If you have some left over, save it (fruit and all) till the next day and re-heat.  Ponche navideño is even better the second day!
    _____________________________________________________________

    Ponche 2 Tipos 2018 1
    Sugar cane is in season in Mexico right now.  On the left, you see it in the already-peeled "sticks" you want for your ponche.  On the right, you see the unpeeled sections that you want for your piñata!  Thanks to Verónica Hernández at Mexico City's Mercado Medellín (corner of Calle Campeche and Av. Medellín, Colonia Roma) for letting me take this photo; if you're in the city, look for her and her employer, Mario Bautista, at Booth 138 in the market–tell her you saw her caña (sugar cane) on Mexico Cooks!.

    Ponche Guayaba Medelli?n 2018 1
    The fragrant perfume of seasonal ripe guavas permeates our markets right now–they're ready to buy for ponche.

    Ponche Tejocotes Medelli?n 2018 1
    Tejocotes are also in season–it's Mexican hawthorn, similar to the crabapple.  Each of these measures approximately 1 1/4" in diameter.  The fruit is very high in pectin, which slightly thickens your pot of ponche.  If you simply cannot find tejocotes, substitute another pound of apples.

    Ponche Tamarindo
    Tamarind pods with their shells on.  If you're unable to find the pods, use about 1/4 pound tamarind paste per recipe.

    Ponche Ciruela Pasa 1
    These are prunes with seeds.  You can use these or you can used seedless prunes.

    Ponche flor-de-jamaica-entera-deshidratada-100-grs-D_NQ_NP_766401-MLA20338152558_072015-F
    Here are the dehydrated jamaica flowers you need to make ponche.  The jamaica flower is a cousin to the hibiscus; its English name is roselle. The flowers add deep red color and cranberry-like tartness to the drink.

    Ponche anis estrella
    Star anise for your ponche.  You will find this in the store where you usually buy spices, at a Latin market, or at an Asian market.

    Jamaica Piloncillo
    Look at this huge display of piloncillo (molded raw brown sugar) at the Mercado de Jamaica, Mexico City!  Why?  EVERYBODY makes ponche at during the winter!  Click on any photo to enlarge.

    Piloncillo Cones 2 Sizes 1
    Here is an up-close look at the two different sizes of piloncillo.  For the ponche, you'll want to buy one kilo (2.2 pounds) of either size.

    Ponche Canela y Pasitas
    This is what's known as canela–Mexican "true cinnamon".  The truth is, it's grown in Sri Lanka and imported to Mexico.  Notice how many, many layers of very thin bark are folded in on one another.  This cinnamon is quite soft, breaks and flakes easily, and is what you want to look for to use in ponche and any other Mexican recipe calling for cinnamon.  Do not be misled into buying cassia, a much more readily found, much harder in consistency, and much less flavorful "fake" cinnamon.  Look for canela at your Latin market; the sticks are usually quite long.  These measure nearly half a yard!  To the right side are Mexican raisins, which, if you like, you can also add to the ponche.  I often do.

    Ponche en taza Kiwilimon
    Old-fashioned Mexican peltre (enamel over metal) cups filled with ponche navideño.  Be sure to put a lot of all of the varieties of fruit into each cup.  Those are caña (sugar cane) sticks (colored pink by the jamaica flowers)–an edible decoration and a tool for pushing fruit from the cup into your mouth!  When you've eaten all the cooked fruit in your cup, chew on the sugar cane sticks for another sweet treat.  Be sure to spit out the fibers after you've chewed them.  Photo courtesy Kiwilimon.

    Provecho!  (Mexico's way of saying bon appetit!)  

    Looking for a tailored-to-your-interests specialized tour in Mexico? Click here: T